
It’s lockdown, almost everyone you know is battling for cash and all you want to do is stream some games online. The trouble is, you don’t have enough cash for a microphone, or an extra camera, or a video capture device so you can capture yourself playing games on a console.
Well, if you’ve got a gaming-capable PC, a smartphone, an internet connection and perhaps a little Lego lying around (to make a basic phone stand), you already have everything you need to set yourself up to stream games online. It’s not quick (unless you follow this guide) and it’s a little dirty but it’s also free of charge — provided you already have the items mentioned at the beginning of this paragraph.
After you’ve made sure you’ve got the base items needed for this little project, there are four more things to get — that’d be the software needed (don’t worry, it’s all free). Then it’s just a matter of putting it all together.
The software
There are four bits of software needed to turn your Windows 10 PC and Android smartphone into a streaming machine. But first, a couple of warnings:
While this method will work with most recent Windows 10 PC/Android phone combinations, the ability to stream will depend on a) the specs of your PC, b) the specs of the phone used as a camera/microphone and c) the sort of internet connection you have available. That said, you can also use this method to pre-record and upload a gaming run, which takes a little of the strain off ageing hardware.
 The first and most important bit of software required is a little something called OBS or Open Broadcaster Software. This is a freeware that supports both Windows and Mac (we’ve used it for both platforms) but you’re looking for the Windows versions specifically.
Then you need two mobile apps installed on your smartphone. The first is IP Webcam, which we’ll be using to turn your smartphone into… well, a webcam. One that works over your home wireless network, no less. The second is WO Mic, which is used to turn your phone into an external microphone. Lastly, you need the WO Mic client software for Windows in order to complete the setup.
So that’s two desktop apps and two mobiles apps — all of which are free. Got it?
Optional: If you don’t already have VLC Player installed on your Windows 10 machine, you might want to get that sorted out as well. It’s a handy workaround if, like us, you run into difficulty during the setup process.
The setup
Finding and downloading the software is the easy bit. If you’ve made it this far, we’re going to assume you know how to install software as well. Android apps tend to take care of themselves, while Windows apps only require a little reading comprehension. Once OBS, IP Webcam and WO Mic are installed, it’s time to convince them all to work together. That’s the tricky bit.
OBS: Initial steps
 Start up OBS and begin by adding in your first few items. You do this by heading to Sources in the bottom left and clicking the + icon. The first two sources you’ll add are Display Capture, which will capture your main desktop, and then Desktop Audio.
Click the +, select Display Capture, and then click OK with the Create New option highlighted. If you only have one display (it happens), then that’ll be the only option you get in the next menu. If you’ve got a multi-monitor setup, you’ll choose which screen you want. You can capture more than one screen, but you’ll have to add more than one display to do so.
Then hit up the + again, select Audio Output Capture, and you’ll have a drop-down with all your audio options. Ours had Realtek Digital Output (Realtek High Definition Audio) and Speakers (Realtek High Definition Audio) but your options will vary depending on sound hardware. We went with Speakers (Realtek High Definition Audio), but you’ll also have to do a little fiddling in the settings to make sure it all works. More on that below.
If at any point you muck up a Source setting, you can just highlight it, click the – icon and it’ll disappear. Either way, we’re done here for now. On to the next app.
IP Webcam
IP Webcam is an interesting app, capable of turning an old smartphone into an IP cam that you can monitor from anywhere. You’re not going to be messing with its cloud functions for this, however. You just need to make sure that the phone with IP Webcam installed is on the same WiFi network as your target PC to get this to work.
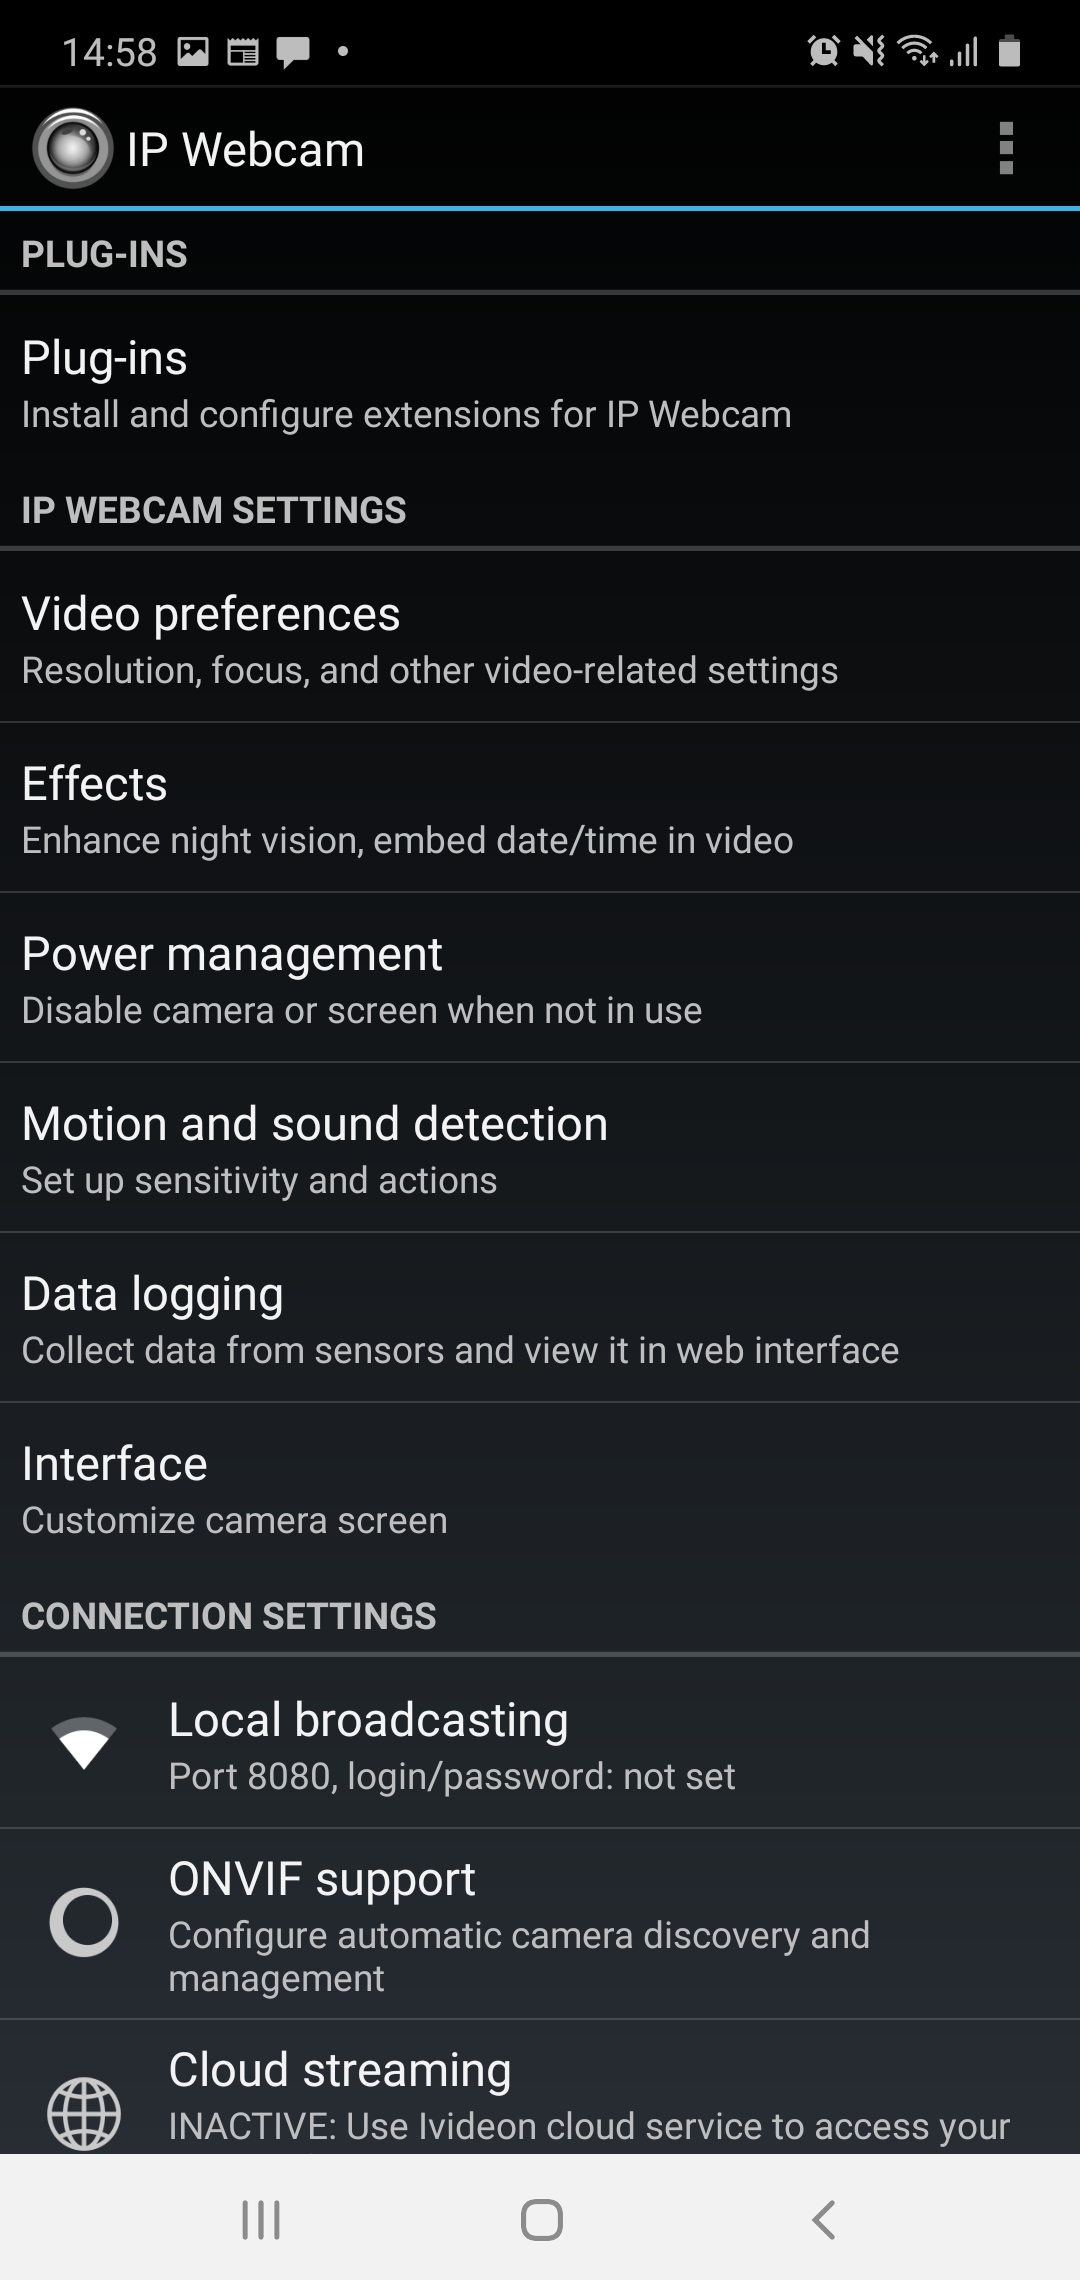 First, check out the Video Preferences setting. Drop Video Resolution to 1280 x 720 (assuming you’re at 1920 x 1080), and be prepared to go lower if you’re experiencing serious issues. The larger the resolution, the more data this whole operation will wind up chewing — which could impact your stream. Open the Quality tab and drop that value to 20 as well. You can go up or down, depending on what your system can handle, but you’re using IP Webcam to make a smaller inset window on your stream — it’s not likely you need it in full HD just yet. Save that for when you’re not hacking together the gear to get it all working.
You can head to Local Broadcasting if you’re keen on using a specific port but if you don’t know what you’re doing there, leave it on the default 8080 — it doesn’t conflict with the WO method laid out below, which is reason enough to leave it alone.
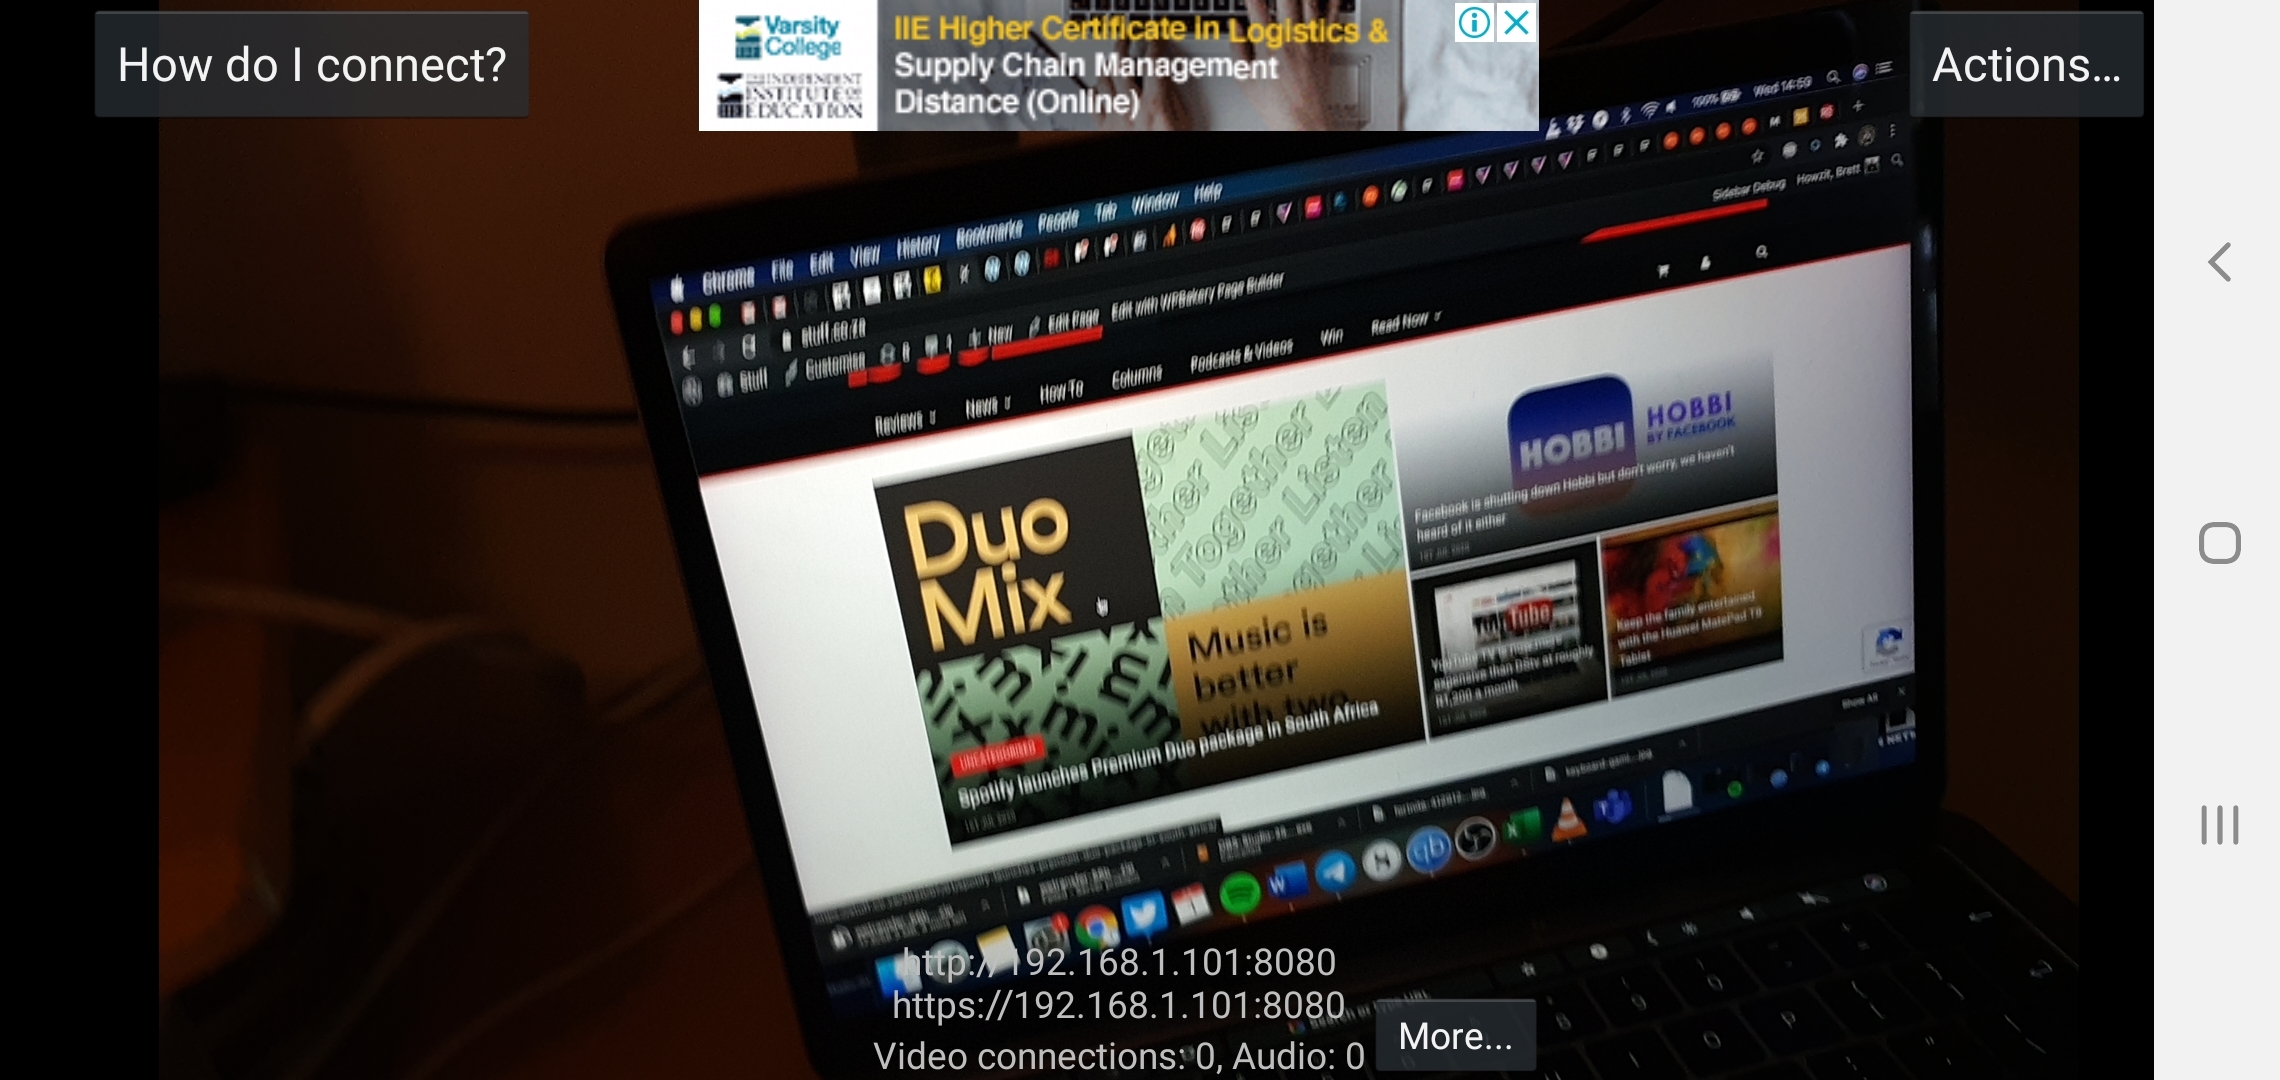 If you’re happy, it’s just a case of starting the stream. Scroll to the very bottom of the app’s main screen, select Start server, and then check out the video you’ve got. The IP address at the bottom middle of the screen (as in the image above) is needed to capture the video from your phone on your stream.
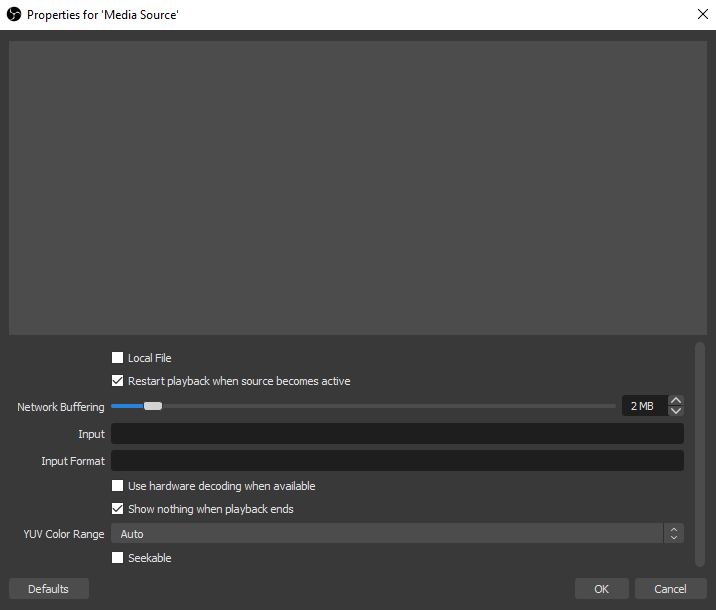 There are two ways to do this on OBS but both involve adding new sources. The first calls for heading to Sources, selecting the + icon and then selecting Media Source. By default, the Local File box is ticked. Untick it. That’ll give you extra options, including the Input field seen in the image above.
It’s here that you need to type in the IP address seen on your screen, exactly as it’s seen on your smartphone. In this particular case, it’s http://192.168.1.108:8080/video. For you, the IP may be different but it’s important to copy the address from IP Webcam directly AND (we can’t stress this enough) add /video at the end of it. Without that, you’re just going to get a blank screen. If you’ve got a picture, you can click OK. Then move around your new capture source, resize it and you’re done here.
Optional/Alternative: You might find that you have better luck opening the IP Webcam stream with VLC media player. This tends to be a less resource-intensive method so it might be worth the extra few steps. It involves using VLC to capture the stream from your phone. You open VLC, select Media and then Open Network Stream — or press Ctrl+N if you’re hardcore. In the network URL bar, enter the IP address from your phone’s screen (and the /video suffix) and you’ll be streaming from your phone to VLC.
THEN… you add a different kind of source to OBS. Click the + icon, select Game Capture and then select Capture specific window in the Mode option. In the Window option, you select [vlc.exe]: video – VLC media player and hit OK. That’s it, instant inset window. Decide where you want it and how big it should be, but remember that it’ll only work as long as VLC is open and capturing the stream from your phone.
WO Mic
So far, so good. But here’s were things might get a little tricky. WO Mic is free but free doesn’t mean easy. There are a few ways to connect the mobile app to your PC, including via Bluetooth, WiFi, or USB, with USB offering the lowest latency, easiest setup, but also the greatest risk to your phone.
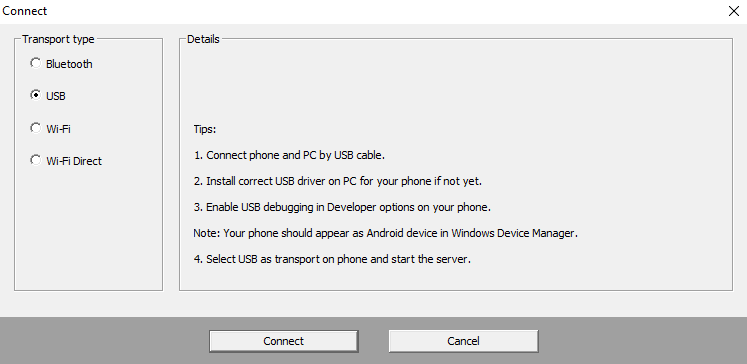 In order to connect via USB (seriously, the WiFi method isn’t worth the headache and will probably crater your stream), you’ll need to Enable USB Debugging on your Android phone. This requires that you enable Developer Mode on your Android which… gives you permission to do stupid things that could cause issues for you. But hey, streaming fame awaits.
To enable developer mode in most Android builds, head to the About section in your phone’s settings, look for your Build Number, and then press it. And again, and again and again. Eventually it’ll tell you that you are “x steps away from being a developer.” Finish this arcane process, become a developer, and then it’s over to your Windows 10 PC for the next step.
Before you connect your phone, you’ll need ADB (Android Debug Bridge) drivers installed on your Windows PC. There are reasons for this and those reasons are ‘Science!’ Head here to grab them from Google, or you can use WO Mic’s own method here. Connect your phone, and then check out your Windows Device Manager (type Device Manager in your Windows 10 search bar and it’ll pop up) to make sure that you’ve got the phone listed as an ADB Interface. If you can’t see it right away, restart your PC and check again (bearing in mind that you’ll need to restart the VLC capture or recheck your IP Webcam stream to make sure the inset video works). If you’re still in trouble, WO Mic has a few other troubleshooting options for you.
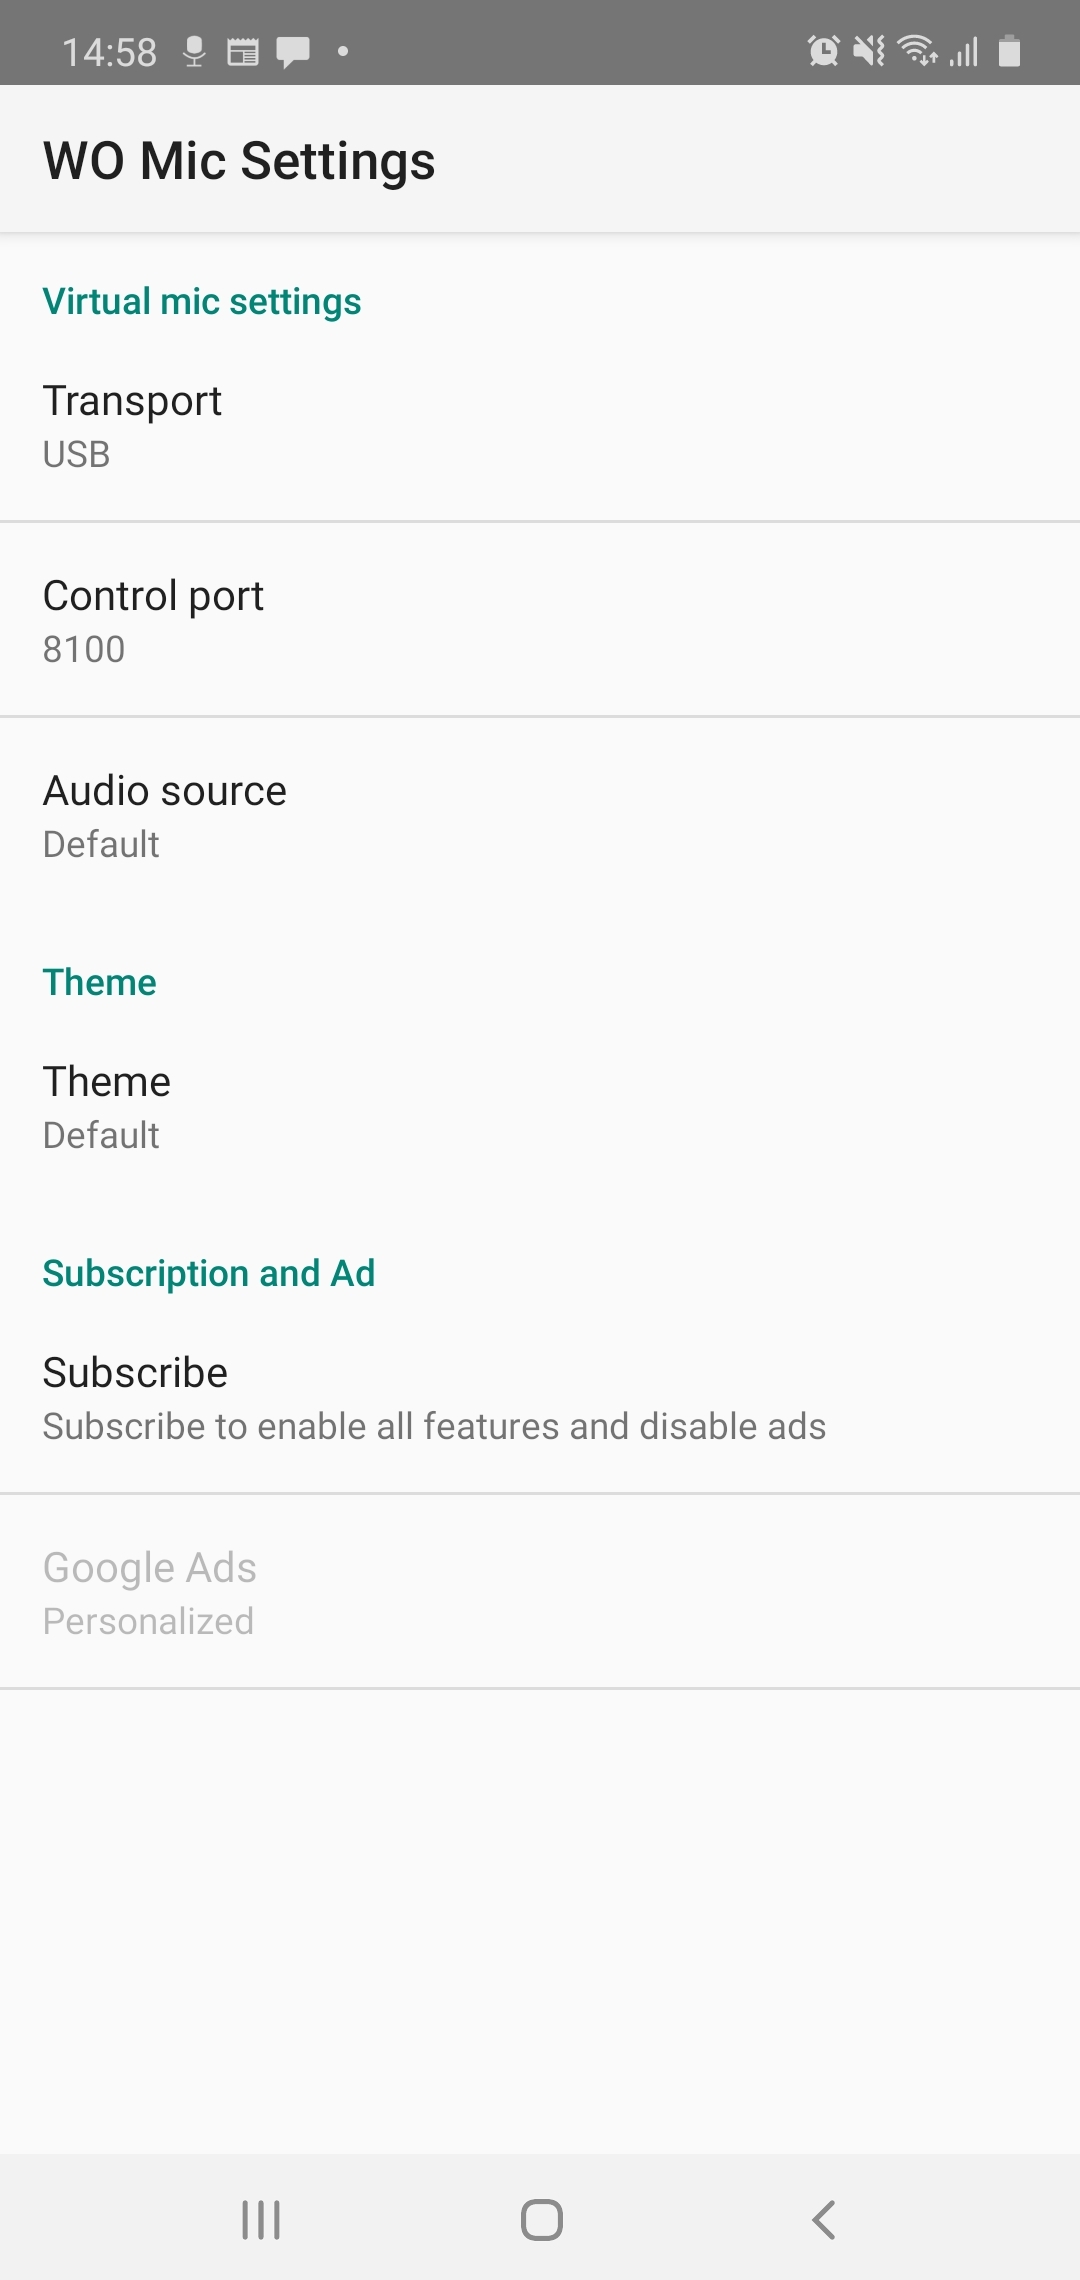 If all has gone well, you can now open the WO Mic Client on your PC as well as the WO Mic app on your phone. Make sure the settings in the Android app match what you see in the client (mostly the Control Port option found under Options -> Advanced — keep the default 8100 value for now). Then make sure you’re connected to your Windows 10 PC using a USB cable, select the Play button on the app and, finally, select Connection and then Connect in the Desktop client. If you get a Connected message in the bottom left of the client, you’re good to go.
Back to OBS
 Which leaves us just a few more things to do and they’re all in OBS. By now, your microphone is up and running and your webcam is also working as intended. You just need to make sure that your audio devices are correctly set up in OBS.
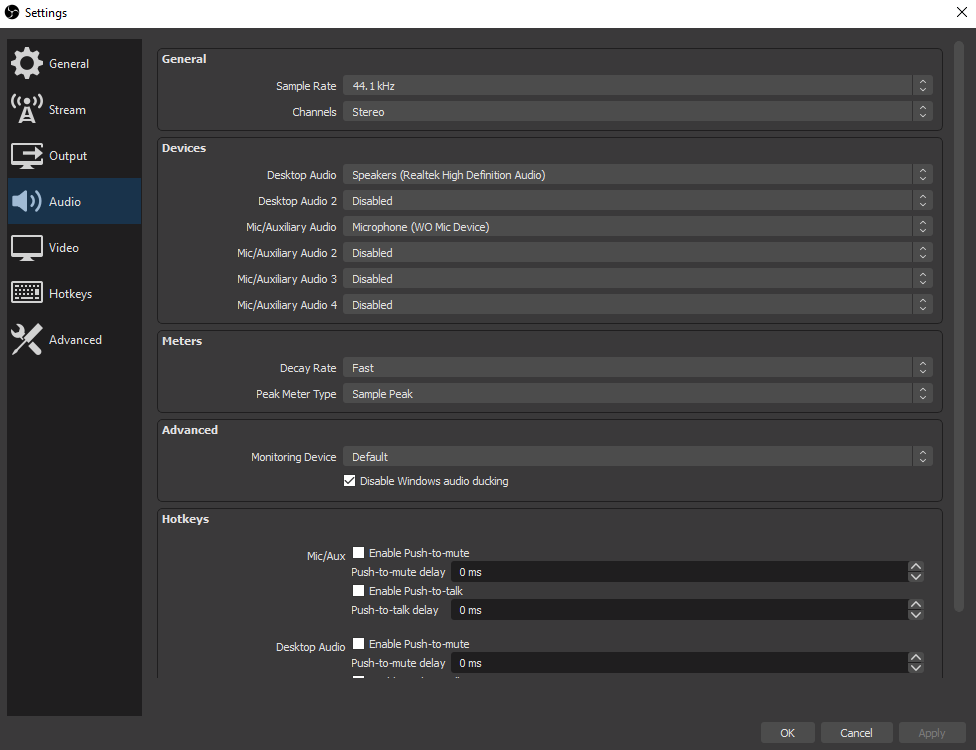
For this, go to File and then Settings and select the Audio option down the left-hand side. You’re looking to set Desktop Audio to the same option you used when setting up Audio Output Capture — in our case, Speakers (Realtek High Definition Audio) but yours will likely differ. Under Mic/Auxiliary Audio you’ll see Microphone (WO Mic Device). If it’s not there, you can head back to the section above to see what went wrong but we believe in you. It’ll be there.
 You shouldn’t have to set up a separate microphone source for WO Mic — it’ll come online by itself but the easiest way to check is to see if the Mic/Aux option under the Audio Mixer moves when you speak. If you’ve got any sort of conflict (you have matching ports for IP Webcam and WO Mic, or you’re attempting to connect WO Mic using WiFi Direct) then one or the other may not work.
There is only one more step — making sure it’s all working. Select Start Recording and test out the capture as it takes place to see if it’s picking up desktop and webcam video as well as game and microphone audio. Before you stream something live, please.
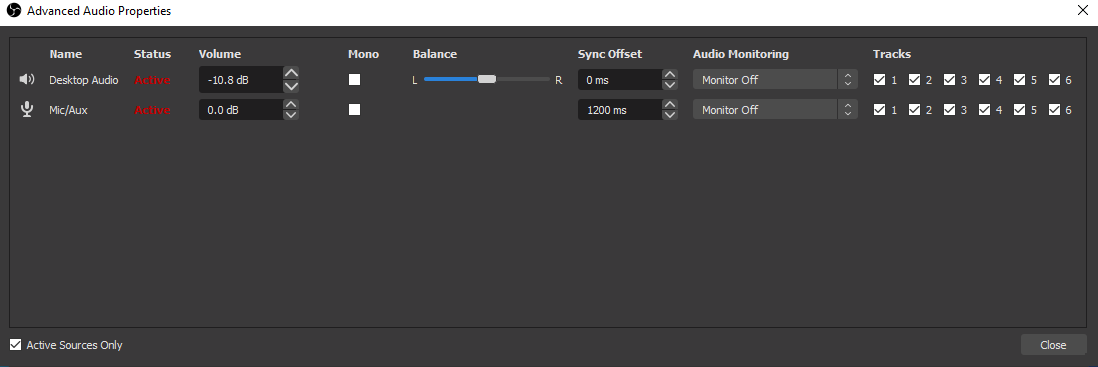
Odds are, as we experienced, you’ll have to add a delay to audio to match up with any webcam delays brought on by streaming video from your phone to your PC. Experiment with the Sync Offset of the mic under Advanced Audio Properties. Hopefully, you don’t have a 1.2-second offset as we did.
Once you’re happy… well, we’re sure you saw the Start Streaming button as soon as you installed OBS. Set up your account info from within OBS (File -> Settings -> Stream) and you’re off.
Header photo by Lucie Liz from Pexels


