
Using Google’s latest mobile OS is as easy as pie when you know where all the best bits are – Stuff reveals the tastiest slices, so you can get more from your phone.
Find your way
Try gestural navigation: Android 9 Pie retains the traditional navigation buttons (back, home, overview) but only by default. We recommend swapping them out for the new gestural system. In Settings, head to System then Gestures and turn on the ‘Swipe up on home’ button. The back arrow will now be contextual, only showing when relevant. The home button will be a flat pill, but it works just as before.
Use the new Overview: In the Overview, gestures more obviously boost speed and fluidity. Flick upwards on the home button to see large previews of open apps, like on iOS. Drag/flick the previews left or right to navigate them and tap an app to expand it.
Get at your apps: Also in the Overview, you’ll see shortcuts to regularly used apps at the bottom of the screen, along with a search bar. To access the apps drawer, drag/flick that pane up. The new home button also enables you to quickly switch between two apps by flicking right over it. This means you can jump quickly between, say, Chrome and Gmail, without using the Overview. Want to kill an app? Swipe its preview upwards.
Control screen rotation: In Pie, you can still disable the display auto-rotate. But the new OS adds a bespoke rotate button in the navigation bar when rotation is possible. This locks your device to the other orientation until the button is pressed again or auto-rotate is reactivated.
Pin an app: App-pinning isn’t new, but it’s now simpler. Open Settings and under ‘Security & location’ go to Advanced, tap ‘Screen pinning’ and turn it on. In the Overview, tap an app’s icon and ‘pin’ to lock the device to that app. Hold the back and home buttons to unpin. In Settings, ‘Lock device when unpinning’ will stop someone nosing through your device.
Snap happy
Take a screenshot: You can still take a screenshot in the usual manner, by holding power and volume down. But Pie also offers a simpler way: hold the power button until a pop-up menu appears, and then tap Screenshot.
Edit your screenshot: When editing, use the drag handles to crop your screenshot. You can also pinch-zoom the image within the crop frame. Underneath this area, you get pen and highlighter tools with a range of colours, and undo/redo buttons in case you make a horrible mess when scribbling.
Power saver
 Boost battery life: If it’s not on already, head to Settings > Battery > Adaptive Battery and turn on ‘Use adaptive battery’. Over time, your device learns your usage patterns. Apps that need more power are prioritised.
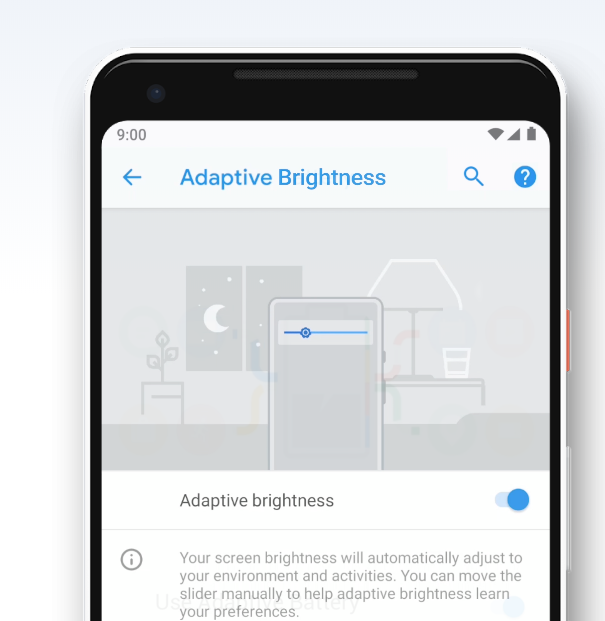
Manage brightness: Turn on adaptive brightness in Settings > Display and your device will attempt to change your brightness settings to match your environment. Manually make adjustments in ‘Quick settings’ and they’ll subsequently be taken into account when automated changes are made.
Get well soon
Heavy user?: In Settings > ‘Digital wellbeing’, the dashboard outlines your general device usage for the day, along with the number of unlocks and notifications received. Tap the graph to delve into per-app figures, and see how often your Android’s been in your mitts.
Learn to wind down: On the Dashboard, tap ‘Wind down’. Turn the feature on and define a schedule during which it will be active. Turn on Greyscale to make your screen look less appealing when it’s time to go to bed, and use ‘Do not disturb’.
Set an app time limit: Tap ‘No timer’ to bring up a timer menu, and define a maximum amount of daily usage for any app. When your allocation’s up, the icon will be greyed out until midnight.
Tame notifications
Block time wasters: If you’re getting sick of an app bugging you with notifications, tap-hold one and then ‘Stop notifications’. Also, in Settings, go to ‘Apps & notifications’ > Notifications to see and disable notifications from apps that recently sent one.
Choose the best bits: If you don’t fancy blocking an app’s communications with you entirely, instead tap the ‘info’ button. When the pane loads, tap ‘notifications’. You can then decide which kinds of notification the app can send, so you’ll only get the ones you want.


